

Introduction
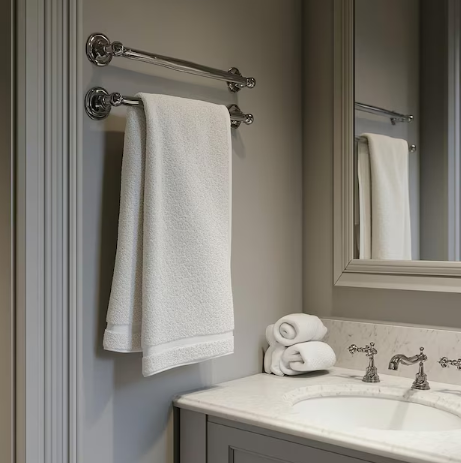
Thinking of giving your bathroom a quick DIY upgrade? One of the easiest and most practical ways to elevate your space is by installing a sleek, modern towel ra. And when it comes to form, function, and a clean finish, the Master Rail towel rail is right up there with the best.
If you’ve been wondering how to install towel rail Australia style — without paying tradie rates — this guide is for you. We’ll walk you through five simple steps for a pro-looking Master Rail towel rail installation that even a first-time DIYer can manage. Whether you’re giving your ensuite a facelift or sorting out your main bathroom, we’ve made the process easy to follow with tools, tips, and no fluff.
Plus, we’ll touch on how UDO Systems makes the whole process easier with their concealed fix systems and DIY-friendly gear.
Let’s get stuck into it.
Why Choose a Master Rail Towel Rail?
Before diving into the install process, it’s worth knowing why so many Aussie home handymen are opting for Master Rail towel rails. They’ve fast become a go-to in bathroom DIY circles – and for good reason.
1. Sleek, Modern Look
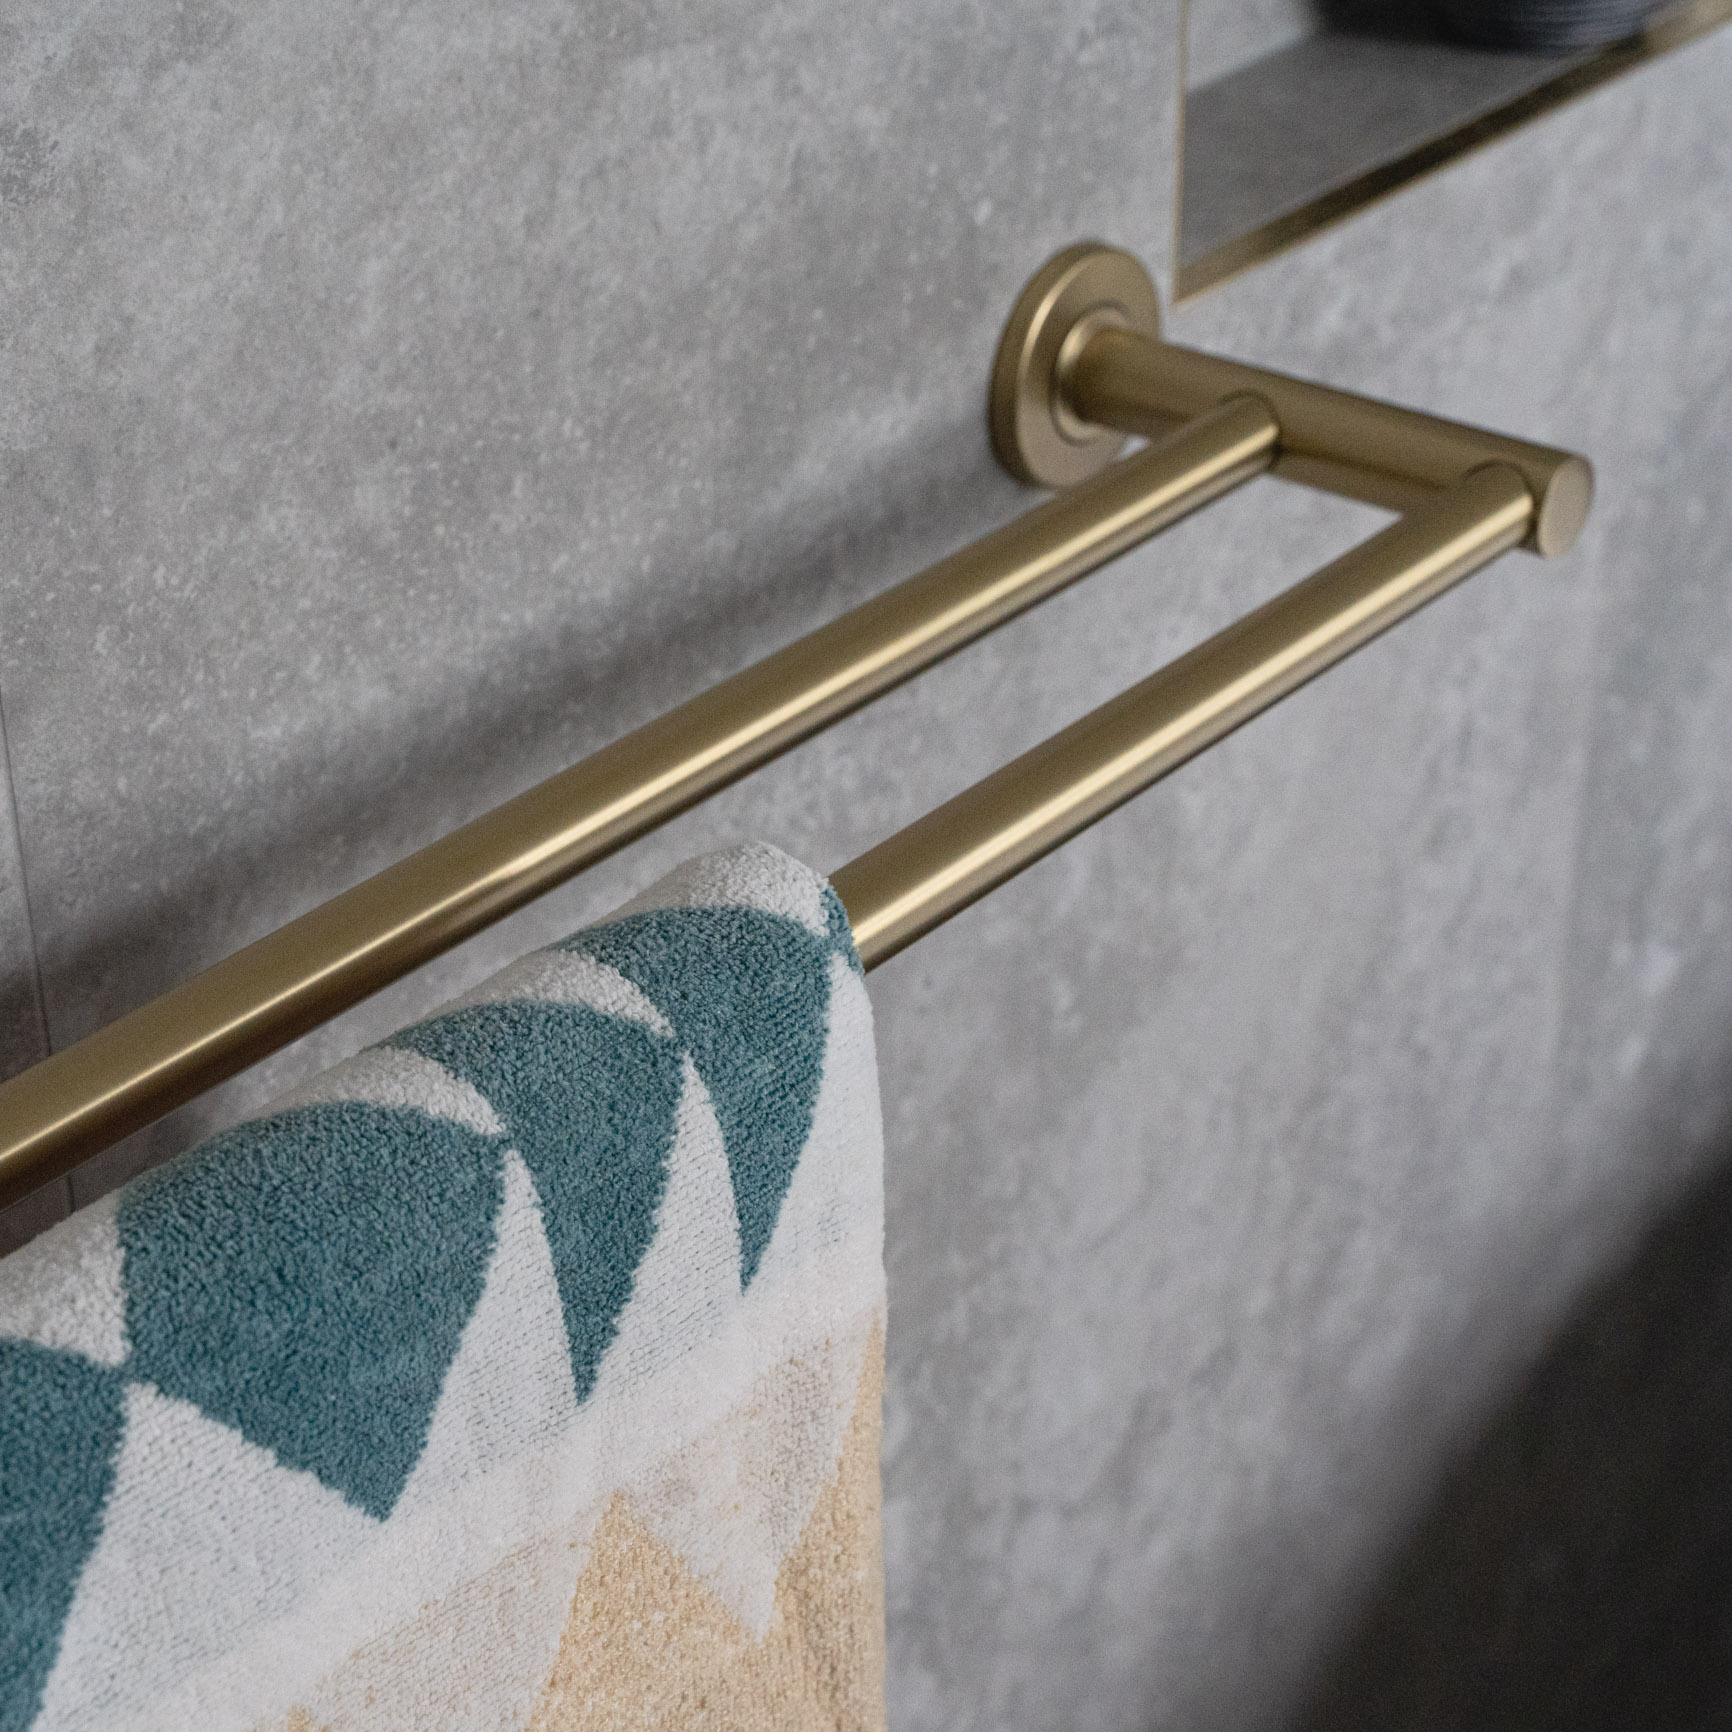
Master Rail towel rails are designed to give you that clean, streamlined look. No cheap brackets, no grub screws and no exposed screws – just a simple rail that looks like it’s floating on the wall. The concealed fix installation is a big plus here.
2. Strong and Durable
These racks are made from high-grade materials to handle daily wear and tear. Perfect for busy family homes or rental properties that need both durability and good looks.
3. Designed for DIY Installs
Master Rail’s design is perfect for people who want to do the job themselves. With no grub screws and a hidden fixing system, it makes the process a lot less fiddly. UDO’s system is particularly handy for this — it’s made to be installed quickly, without needing complex tools or expensive tradie help.
4. Works With Tiles
Most bathrooms have tiled walls, and fixing to tile can be a headache if you don’t have the right setup. Master Rail is tile-friendly, and with a few precautions, you can safely install it without cracking a single tile.
So, if you’re keen on a simple, sharp-looking upgrade, a Master Rail towel rack is a great shout.
Tools and Prep – What You’ll Need
Before you get started, make sure you’ve got all your tools and prep sorted. Having everything on hand makes the job quicker and reduces mistakes.
Essential Tools:
- Cordless drill (with hammer function off)
- Tile drill bits (6mm masonry or carbide tip)
- Screwdriver or driver bit
- Measuring tape
- Spirit level
- Masking tape or painter’s tape
- Pencil or non-permanent marker
- Safety glasses and gloves
Optional but Helpful:
- Wall anchors or tile plugs (depending on your wall type)
- Vacuum or dust brush
Prep Tips:
- Check your wall – Tiled surfaces can be ceramic, porcelain or even glass. Use a proper tile drill bit to match.
- Turn off any water near the wall – Just in case you’re near hidden pipes.
- Clean the surface – Make sure the tiles are dry and free from dust or grease.
- Plan your layout – Consider height, spacing from other fittings, and where the towels will hang naturally.
Thanks to the Master Rail’s concealed fix system, you won’t need to deal with fiddly grub screws. That’s a huge bonus!
Installing Your Master Rail in 5 Easy Steps
Let’s break it down. This part walks you through the whole install process in simple terms. Even if you’ve never done bathroom DIY before, you’ll be able to follow along.
Step 1: Mark and Measure
Start by measuring the exact spot where you want the towel rack to sit. Standard towel rails are usually installed around 1200mm from the floor, but it’s up to you — just make sure there’s enough space for towels to hang.
Use your spirit level to ensure your marks are straight, then use masking tape to mark your drill points. Masking tape helps the drill bit grip the tile and reduces slippage. You’ll want to measure twice and drill once – it’s much harder to undo a misplaced hole on tile.
Tip: If your rail comes in multiple sizes, choose a spot that avoids grout lines where possible.
Step 2: Drilling into Tile Safely
This is the trickiest part for most DIYers, but with a steady hand and the right bit, it’s simple enough.
Here’s how:
- Start with a tile drill bit — not a regular masonry one.
- Keep the drill speed slow and steady — don’t force it.
- Don’t use hammer mode – this will crack the tile.
- Drill until you’re through the tile, then switch to a regular masonry bit if needed for the wall behind.
- Insert wall plugs or tile anchors to give your screws proper hold.
Keep your vacuum or brush handy to remove tile dust as you go. If you’re using UDO’s concealed fix design, you’ll likely only need two or four small pilot holes.
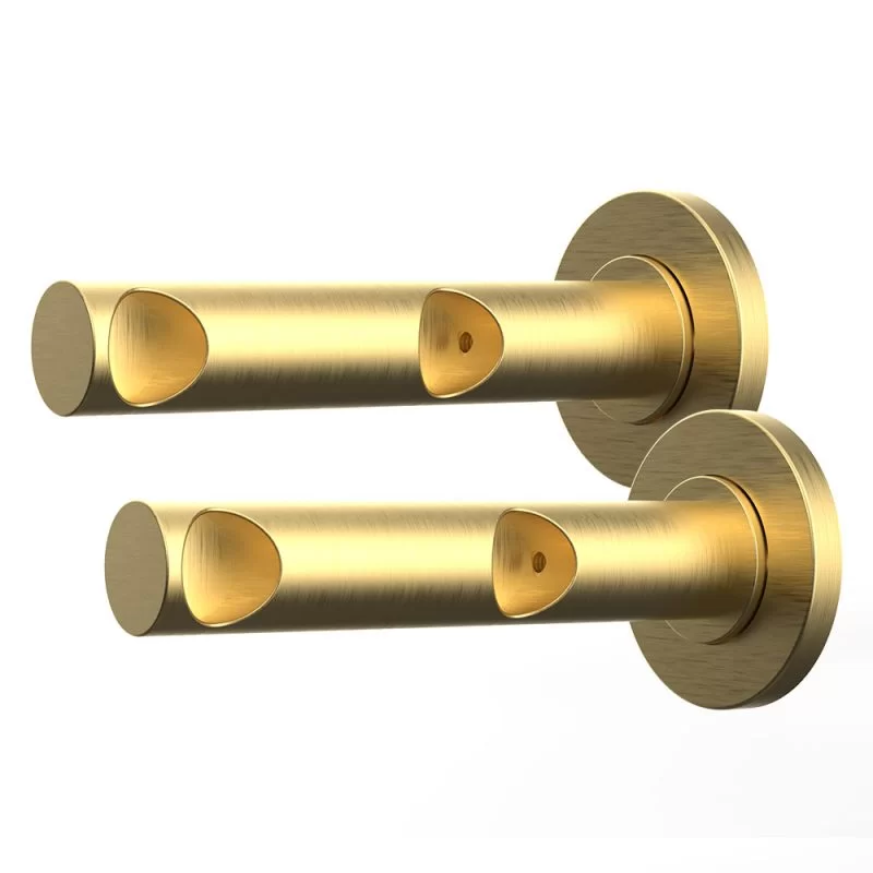
Step 3: Fitting the Mounts
Once your holes are drilled and cleaned, line up the mounts or base plates with your marks.
Secure them with the screws provided, making sure they’re flush with the tile and sitting straight. Check with the spirit level before you tighten everything down.
With UDO’s Master Rail, the mounts are designed for a bracket-free install – which means no visible fixings once the rail is on. It’s a very neat finish and a big win over older styles.
Step 4: Attaching the Master Rail
Now it’s time to slide the rail onto the mounts.
Gently tug on it to check the hold. If it feels loose, double-check your mount screws.
The concealed fix design really comes into play here – once attached, the towel rail looks seamless. There are no clunky brackets or bits poking out, just a clean, minimalist finish.
Step 5: Final Touches and Checks
Give the entire rack a once-over. Is it level? Is it secure? Wipe away any pencil marks or tape and give it a quick polish with a soft cloth.
If you drilled into a bathroom wall that’s prone to moisture, you might want to seal around the mounts with a small bead of clear silicone to keep things watertight.
And you’re done! Your towel rack is now good to go.
Common Installation Mistakes (and How to Avoid Them)
Even experienced DIYers can hit a snag here and there. Here are a few common issues and how to avoid them.
1. Drilling into Grout Lines
Grout is softer than tile and prone to cracking. Always try to drill into the tile body itself for a stronger, cleaner hold.
2. Using the Wrong Bit
Tile needs a proper tile drill bit. Masonry bits will just skate across the surface or chip the tile.
3. Skipping the Spirit Level
It might look straight to the eye, but you’ll notice if the rail is slightly off. Always double-check.
4. Over-tightening Screws
This can crack tiles or strip your wall plugs. Tighten firmly, not forcefully.
UDO Systems actually helps reduce these kinds of issues with their easy-to-follow install kits and gear designed for concealed mounting.
Why UDO Systems Makes It Easier
UDO Systems have really nailed the DIY-friendly design. Their Master Rail series is made with the home handyman in mind – stylish but functional, and most importantly, easy to install.
Their towel racks come with concealed fixings that blend into your bathroom, giving a seamless look. The no-bracket design means you don’t need to worry about extra pieces or visible parts. Plus, the instructions are clear, and their customer support is always on hand if you need help.
If you’re keen on tackling other bathroom upgrades, UDO also offer a full range of accessoires built to Aussie standards – made to last and easy to fit.
Maintenance Tips
Once installed, your towel rack won’t need much looking after. But a few quick habits will help it last longer and keep looking fresh.
- Wipe it down regularly with a soft cloth
- Avoid harsh chemical cleaners – warm soapy water does the trick
- If near a shower or bath, check mounts every few months
Conclusion
Installing a Master Rail towel rack is one of those jobs that looks harder than it really is. With the right tools and a bit of patience, you can get it done in under an hour — no tradie required. Whether you’re fixing to tile, going for a concealed fix install, or just want to freshen up your bathroom, the five steps outlined above will see you through.
With UDO Systems’ innovative no-bracket, no grub screw designs and easy-to-follow instructions, you’re never on your own. They’ve made it easier for Aussies to take their bathroom upgrades into their own hands.
Ready to get started? Explore more towel rails and bathroom hardware built for easy installation over at UDO Systems.
FAQs
1. Can I install a Master Rail towel rack without professional help?
Absolutely. If you’ve got basic tools and a steady hand, this is a DIY-friendly job. UDO Systems makes it even easier with products designed for simple home installs.
2. What tools do I need for a concealed fix install?
You’ll need a drill, tile bit, screwdriver, level, measuring tape, masking tape, and wall plugs. It’s all fairly standard gear for bathroom DIY.
3. How do I avoid cracking tiles when drilling?
Use the right drill bit (tile-specific), skip the hammer function, and go slow. Tape your mark, and always drill into the tile face, not grout.
4. Can I remove the rail without damaging the wall?
Yes, especially with concealed fix models. Just reverse the steps and patch the holes with a bit of filler or tile plug if needed.
5. Where can I buy a Master Rail towel rack in Australia?
You can get quality towel rails with easy installation features from UDO Systems selling network across Australia. Head to UDO Systems to browse their range and find a store near you.


